
That familiar ache along your inner shin mid-run is not something you can simply ignore and hope disappears. Medial tibial stress syndrome, the condition most runners know as shin splints, affects up to 16% of runners at some point in their training, and handling it wrong can turn a manageable overuse injury into a stress fracture that sidelines you for months.
KT tape shin splints application has become a go-to strategy for runners trying to stay active during recovery, but most guides stop at technique and skip the reasoning entirely. This one does not. You will learn exactly what is happening inside your lower leg when shin splints develop, why kinesiology tape can genuinely reduce periosteal stress when applied correctly, and how to perform a precise, step-by-step application that actually supports the tissue under load. More importantly, you will learn when taping is appropriate, when it is not, and which warning signs mean you need to stop training and get a professional assessment. Taping without that full picture is how minor shin pain becomes a serious bone injury.
What shin splints actually are (and why the label matters)
“Shin splints” is a catch-all term for any shin pain. The correct clinical label is medial tibial stress syndrome (MTSS): diffuse pain along the inner border of the tibia caused by cumulative stress on the periosteum, surrounding muscles, and connective tissue. That distinction matters because other conditions, including stress fractures and compartment syndrome, produce similar symptoms but require very different responses.
Up to 16% of runners develop MTSS, making it one of the most prevalent running injuries. It tends to surface when runners ramp mileage too quickly or train primarily on concrete, where ground reaction forces are highest. Flat feet, high arches, sudden volume increases, and hard surfaces all appear consistently among the risk factors.
MTSS sits on a continuum: mild periosteal irritation at one end, stress reaction in the middle, and stress fracture at the other. Where you fall on that spectrum determines whether taping and modified training are appropriate or whether you need to stop entirely. This guide is general information only, not a diagnosis. If you are unsure what you are dealing with, see a physician or sports physiotherapist before taping or continuing to train. For a broader picture of causes and return-to-running structure, the Enter2Run guide on shin splints: causes, prevention, and how to get back to running is a practical starting point.
Why kinesiology taping for shin splints can actually work
Kinesiology tape is not rigid athletic tape. It is a thin, elastic cotton material that stretches along its length. Applied with tension along the medial tibia, it gently lifts the skin and reduces direct pressure on the inflamed periosteal tissue beneath.
Three mechanisms are proposed. First, the skin lift improves local blood and lymphatic circulation, and objective measurement via laser doppler flowmetry confirms that kinesiology tape increases cutaneous blood flow at rest. Second, the tape stimulates skin receptors, improving proprioceptive feedback and neuromuscular awareness. Third, it can redistribute plantar pressure away from the medial forefoot during the stance phase. Increased medial plantar loading is directly linked to MTSS development, so altering that pattern matters.
Tension level is the mechanism, not a minor detail. A placebo-controlled trial of 32 participants found that kinesio tape applied at 75% tension produced significantly better outcomes for pain, postural control, and plantar pressure distribution than placebo tape applied with no tension.
Reported pain reductions range from 40 to 60%, with effects typically visible within one week. Those figures are worth taking seriously and worth keeping in perspective: only four peer-reviewed studies covering 141 total participants exist on this topic, so treat them as promising rather than definitive. You can read more in the Enter2Run guide to shin splints: what they are, why runners get them, and how to come back stronger.
Kinesiology taping is an adjunct to load reduction, not a standalone fix. The tape does not repair tissue. It buys a training window by reducing periosteal stress, provided you also reduce the training load that caused the problem.
When taping shin splints is the right call
That training window taping buys you is only useful if you are a genuine candidate for it. Here is how to tell.
The symptom profile that fits best is early-stage MTSS: a diffuse, aching sensation along the inner tibia that starts after the first mile or two, settles within 30 minutes of stopping, and is absent during normal walking. If that matches, taping combined with load reduction is a reasonable short-term tool.
The runner it suits most is someone several weeks into a structured build, a first half-marathon plan, a return-to-running program, or a recreational couch-to-5K-style progression into a 10K. You need a short-term bridge to protect a training block you have already invested in, not a permanent fix.
The critical condition: taping only works alongside a genuine reduction in training load. Keep the same mileage and pace, and you are suppressing feedback your body is giving you, not allowing tissue to recover.
Taping also does not address why stress accumulated in the first place. Gait mechanics, footwear suitability, and mileage ramp rate are the root causes. The tape keeps you moving while you address those factors. It does not replace that work.
One clear disqualifier: if pain arrives within the first few minutes of a run and does not ease as you warm up, taping alone is unlikely to be sufficient. Pause training and get a professional assessment before continuing.
Red flags: when to stop training and see a professional
Knowing when tape is the right tool matters as much as knowing how to apply it. These red flags are non-negotiable.
Point tenderness directly on the bone. Run a finger along your tibial shaft. Diffuse aching across the inner leg is typical of MTSS. Sharp, pinpoint pain at a single spot can indicate a tibial stress fracture. Stop and get a professional assessment.
Pain at rest, night pain, or pain during normal walking. Shin splints are activity-dependent; the ache appears under load and settles within 30 minutes of stopping. Pain while sitting, at night, or through a normal walk operates on a different mechanism and warrants medical evaluation before running continues.
Worsening pain across consecutive runs despite load reduction. If each run hurts more than the last, tissue stress is outpacing recovery. Taping through escalating symptoms carries real risk of progression to a more serious bone stress injury.
Skin contraindications. Kinesiology tape is contraindicated over open skin, a rash, sunburn, or any area with a known sensitivity or allergy to adhesive materials. Applying tape to compromised skin will worsen the problem.
The structural reality of a stress fracture. Kinesiology tape provides no support to bone. No application technique changes that. A stress fracture requires complete rest from impact and medical management.
If any of the above apply, close this tab and book a physiotherapy or physician appointment. Runners with knee pain alongside shin issues may find our overview of runner’s knee causes and treatment useful to bring to that appointment.
What you need before you start
If none of the red flags in the previous section apply, you are ready to set up correctly. Each item below affects whether the tape stays on and does its job.
Kinesiology tape. A standard 2-inch (5 cm) roll works for this application. Pre-cut strips designed for the lower leg are a practical alternative. Brand matters less than elastic specification: look for tape labeled at 130 to 140% elasticity, the stretch range used in MTSS clinical research. Tape outside that range may not produce the tension needed to influence plantar pressure distribution.
Scissors. Use a clean, sharp blade and cut rounded corners on every strip before removing the backing. Rounded corners reduce edge peeling that kills adhesion mid-run.
Prepared skin. Wash the medial tibia and calf with soap, rinse, and let skin dry completely. Oils, lotions, and sweat all reduce adhesion. If your lower leg is heavily haired, shave or clip the area 24 hours before taping, not immediately before, to let skin sensitivity settle and make removal less uncomfortable.
Enough lead time. Allow 30 to 45 minutes between application and your run. The acrylic adhesive needs time to bond fully. Taping in the parking lot two minutes before you start is one of the most common reasons tape fails early.
Optional but worth it: a skin prep spray or wipe designed for medical-grade tape adhesion. If you run in heat or sweat heavily, this step makes a measurable difference to wear time.
The principles that make tape adhere here overlap with those for any adhesive sports dressing. If you have ever dealt with runner’s knee and the support taping that sometimes accompanies it, the same skin prep steps apply.
Step-by-step KT tape application for shin splints
With your skin prepped and strips cut, work through these seven steps in order. Skipping or rushing any one of them is the most common reason kinesiology taping for shin splints fails before the first run.
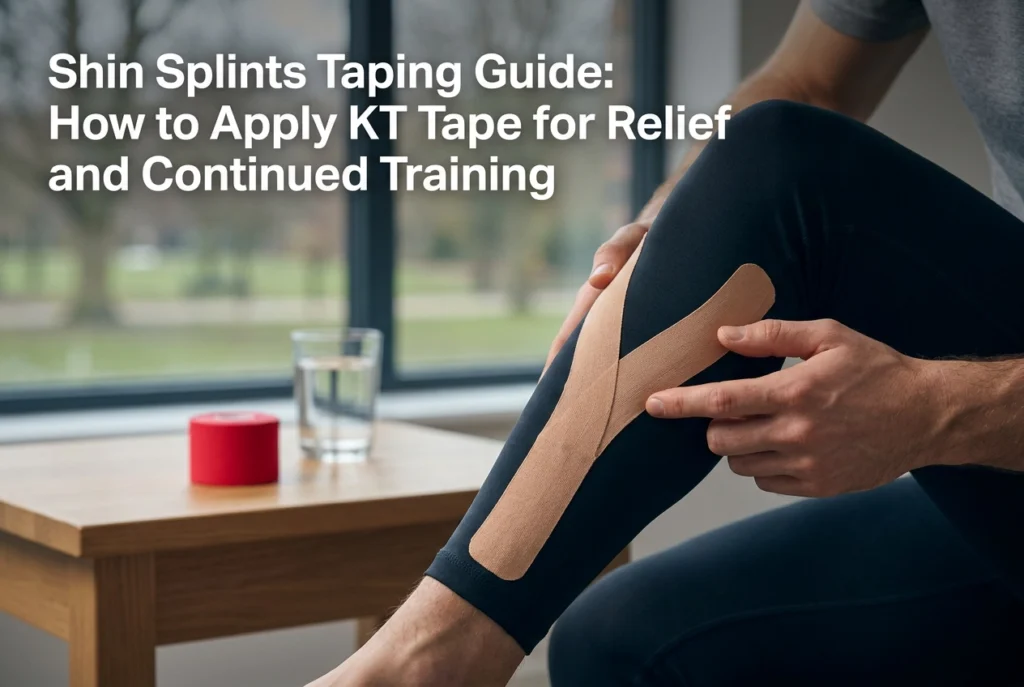
Step 1: Position correctly. Sit with the affected leg extended and your foot flexed upward at roughly 90 degrees. This dorsiflexed position mildly stretches the calf and tibial tissue. Applying tape with the foot pointed produces a strip that bunches and peels once you start moving.
Step 2: Cut your strips. Cut Strip A to 25 to 30 cm for the primary medial tibia run. Cut Strip B to 10 to 12 cm as a cross anchor for the most tender zone. Round all four corners on both strips before removing any backing.
Step 3: Anchor Strip A at the ankle. Expose a 3 to 4 cm anchor at one end. Place it just above the inner ankle bone (medial malleolus) with zero tension. Press firmly for 10 seconds.
Step 4: Apply Strip A at 75% tension. Peel the backing progressively as you run the tape upward along the inner edge of the shinbone toward the upper third of the tibia. Pull close to full stretch, then ease back slightly. This tension level is associated with improved plantar pressure redistribution in a placebo-controlled trial.
Step 5: Finish with a zero-tension tail. In the final 3 to 4 cm, release all tension and lay the tape flat. A tensioned end anchor lifts and peels quickly.
Step 6: Apply Strip B as a cross anchor. Press the center of Strip B horizontally across the medial tibia at the point of maximum tenderness using 50% tension, then lay both ends down with zero tension.
Step 7: Activate the adhesive. Rub firmly over both strips with your palm for 20 to 30 seconds. The heat from friction bonds the acrylic adhesive to the skin and meaningfully extends wear time.
The load reduction checklist: what to change alongside taping
The tape is on. Now the tape needs help.
Correct application technique reduces periosteal stress; it does not eliminate the cumulative tibial load that caused the problem. These six adjustments determine whether the tape buys you a real recovery window or just masks symptoms.
- Cut weekly mileage by 30 to 40% in week one. If you were running 25 miles per week, drop to 15 to 17. The tape handles the stress reduction per step; lower volume reduces the total number of steps the tape has to compensate for.
- Run easy only. Keep every run at conversational effort, roughly 60 to 70% of maximum heart rate. Speed work, tempo intervals, and hill repeats impose tibial loads that tape at any tension level cannot adequately offset. Pause them entirely for the taping period.
- Change surfaces where you can. Grass, packed gravel, or a rubberized track produce lower ground reaction forces than concrete or asphalt. Even one or two softer-surface runs per week meaningfully reduces cumulative tibial load across the training week.
- Swap one or two runs for cross-training. Pool running, cycling, and swimming maintain aerobic fitness without adding tibial bone stress. This is a practical bridge that keeps your fitness intact, not a step backward.
- Check your shoes. Worn midsole foam, compressed heel counters, or geometry poorly matched to your gait amplifies the forces the tape is working against. Shoes past 400 to 500 miles may be contributing more than you think.
- Monitor pain at three points each run: the start, the midpoint, and the finish. Use a 0 to 10 scale. If pain exceeds 2 to 3 out of 10 at any point, end the run early. The training plan can wait; escalating symptoms cannot.
How long to wear the tape and when to reapply
A correctly applied strip remains effective for 2 to 5 days and is water-resistant enough to survive showers and easy runs without removal.
Check the tape once a day, particularly at the anchor ends. Lifted edges collect sweat and debris, weaken adhesion across the whole strip, and can irritate the skin beneath. If an edge is peeling, trim it with clean scissors rather than pulling the entire strip off.
When the tape has reached the end of its cycle, peel slowly back on itself, parallel to the skin rather than pulling upward at 90 degrees. Support the skin ahead of the peel with your free hand. If the tape is adhering tightly, wet it thoroughly in the shower and let it soak for a minute before peeling.
Before reapplying, give the skin at least 2 hours of rest. Continuous adhesive contact without a break can cause low-grade irritation that worsens with each successive cycle.
A typical early-stage MTSS taping protocol runs 1 to 3 weeks when combined with genuine load reduction. If your symptoms have not improved meaningfully after two weeks, that is a clear signal to book an appointment with a physiotherapist or sports medicine physician, not to apply another strip and keep going.
Tape is a short-term tool for a short-term window. It does not repair tissue; it creates conditions where tissue can recover. If ongoing symptom management through taping starts to feel like your training strategy, the injury has moved past what taping can address.
A practical note before your next run
Done right, kinesiology taping for shin splints is a genuine short-term tool: 75% tension applied to the medial tibia, combined with a real reduction in training load, gives most early-stage MTSS runners a viable window to continue low-intensity work while the tissue recovers.
The technique is the variable most runners underestimate. Zero-tension anchors, progressive tension along the tibial run, and a horizontal reinforcing strip at the point of maximum tenderness are not optional refinements. They are what separates a strip that stays in place and does something from one that peels off before the two-mile mark.
Hold the evidence in proportion. Four peer-reviewed studies, 141 total participants: that is a promising foundation, not a guarantee. Apply the technique correctly, reduce the load genuinely, and monitor your response across runs. That is all the current research can reliably support.
If any red flag from earlier in this guide applies to your situation, particularly point tenderness directly on the bone, pain at night, or symptoms that worsen across consecutive runs, the answer is a physiotherapist or sports medicine physician, not a better tape job.
For the broader picture, including how mileage progression and footwear choices contribute to tibial stress in the first place, the Enter2Run training guides on injury prevention and mileage building are a practical next step alongside this one.
Conclusion
Shin splints are manageable, but only if you respond to them honestly. KT tape applied with correct tension and anchor placement gives early-stage MTSS a genuine recovery window. Reducing training load alongside taping is not optional; it is the mechanism that actually allows healing. And recognizing the red flags, especially bone-point tenderness or night pain, determines whether self-management is appropriate at all.
Used together, these principles let most runners stay active while protecting the tissue that needs time.
Your next step is straightforward: apply the technique as described, cut your load genuinely, and assess your response after each session. If symptoms improve, you have a working plan. If they do not, book the appointment.
Tape smart, train smarter, and give your body the conditions it needs to keep you running long-term.